Help for transcribers working with capella
- Table of contents
- Help for transcribers working with capella
- Please note
- Accidentals
- Accordion
- Alteration
- Annotations
- Arpeggio
- Articulation
- Artificial rests
- Bar Chord
- Bar line
- Bar number
- Brackets
- Breath mark
- Breve
- Changing fingerings
- Changing intervals
- Chord symbols
- Clefs
- Composer
- Dedication
- Empty Syllable
- Ending
- Exercise numbers
- Figured Basses
- Fingerings
- Footnotes
- Free Playing / Cadenzas
- Glissandi
- Grouping signs
- Hand switch
- Horizontal format
- Idler
- Incoding
- Indication of rights
- Indication of sources
- Information on playing time
- Information on register
- Instrument classes
- Instrument names
- Intervals
- Key
- Keyboard instruments
- Language
- Lines of continuation
- Longa (Note / Rest)
- Maxima (Note / Rest)
- Media specific markup
- Metronome information
- New piece
- Organ pedals
- Ottavæ
- Page turn
- Pedal
- Pedalset
- Performance
- Phrasing slurs
- Piano reductions
- Plucked instruments
- Publisher Ties
- Publisher's symbols
- Reading direction of intervals
- References
- Section
- Section title
- Separation of large pieces
- Shortcuts
- Size of note-heads and rests
- Slide
- Slurs that do not end on a note
- Slur symbols
- Small-print notes and rests
- Solo part, to be accompanied
- Son filé
- Song texts
- Stave changes
- Staves
- Stem signs
- Straight line for voice-leading
- String instruments
- Text blocks
- Texts
- Time signature
- Title
- Tone clusters
- Trill wave
- Triple dotting
- Triplets
- Updates
- Variations
- Vocal range
- Voices
- Wedges
- Whole Rests
- Wind instruments
- Word insertions
This help page (in alphabetical order) has been written to help transcribers to work with capella to mark up a file suitable for conversion into music Braille with MakeBraille, and contains specific guidance in addition to the normal capella manual/help system.
It gives advice on how to:- control the output
- add features which are not supported by capella.
Please note
- All of the following special notations on existing texts may only be applied to "single texts". "Simple texts" (call via Alt+Shift+X) exist in capella next to "Text fields (HTML)" (call via Alt+Shift+T). The texts can, for example, already be normalised under capella-scan by opening the pop-up menu with the right mouse button on the text and using the ABC icon there. Normalisation under capella is only possible by creating a new text object with the same content. Calling the CapScan optimiser also converts some text fields into single texts.
- Please be aware - if you are entering music notation directly as Braille text that is based on your own country encoding (e.g. with Variations, or footnotes explaining how to express a trill mark) there may be some conversion problems - please report any issues.
Last Updated: 15.12.2020
Accidentals
In capella, single accidentals may be forced, suppressed or put into brackets. In order to change a single note in such a way, one may mark it by using Ctrl+mouse. In order to create square brackets, see below.
In capella, it is not always possible to format accidentals as one would like, if a chord is present. This is especially true in connection with incoming ties. In this case, one may add information to a chord by using {ACC:info}, info being a list containing information about the accidentals of single note-heads. The following control characters for accidentals are available:
| transfer unchanged | ! |
| delete | _ |
| write round brackets | ( |
| write square brackets | [ |
| delete brackets | ) or ] |
Accidentals marked with ! (top) can be retained unchanged, accidentals marked with _ (bottom) are deleted. Both characters do not change anything, if no accidental is there. If accidentals are there, bracketing may be forced by using ( resp. [. By using ) or ], a possible bracketing will be deleted. In contrast to bottom, the possible accidental character will be retained resp. forced in this case. Any number of separators may be written.
If the real pitch is supposed to be influenced, one has to operate this by using {ALTER:...}. In this case, the characters from the following chart apply:
| keynote increased by two semitones | 2 |
| keynote increased by one semitone | 1 |
| keynote | 0 |
| keynote decreased by one semitone | -1 |
| keynote decreased by two semitones | -2 |
There is only one case, where the pitch has to be influenced: if fewer ties lead into a chord than there are note-heads, one should always correct the pitch unconditionally as this may lead to mistakes with capella. The pitch correction via {ALTER:...} always has to be supplemented with a notification correction via {ACC:...}.
Examples:
1. {ACC:[,_,_} writes the accidental character of the first head in brackets and represses the other accidental characters.
2. {ACC:_!} deletes a possible accidental character in front of the first head, but keeps the one in front of the second. One possible scenario would be one where the accidental characters have been put in brackets for the chord, but where this is correct only for the second head.
3. {ACC:!_)} keeps the first and deletes the second accidental character. With the third, only the brackets are removed. This could happen, for example, if accidental characters in the inkprint within a chord are put in brackets only partly.
4. {ALTER:10)} and {ACC:))} put the pitch of the first note up by one compared with the keynote, the second note is put on the position of the keynote. Both accidental characters are displayed explicitly.
By using {ACC:...}, only the accidental characters (meaning only their brackets and visibility), but not the pitches themselves are influenced. Thus, by using ( one may, for instance, force the bracketing of a present (but possibly repressed) accidental character only. The accidental characters are principally read from top to bottom.
If, in the inkprint, an additional natural character is positioned in front of an accidental character, one has to write {AN} (resp. {(AN)} or {[AN]} for brackets) with the note. If there are a number of notes in a chord, one may control the individual character analogically by using {AN:...}. In this case, the controlling characters are _ (delete possible additional natural character), ! (keep possible additional natural character unchanged), n (add additional natural character), ( (additional natural character in round brackets) and [ (additional natural character in square brackets).
Accordion
The specification of accordion can be forced explicitly at the beginning of the conversion or can be displayed indirectly. On the one hand, you may simply state an instrument's name, if it is known as accordion via the file lib/instruments.pl/instrument_class. The accordion is also recognised automatically if there is information about the register. A general solution is to write the keyword {ACCORDION} into the relevant part.
During the scanning of notes, you may remove the symbols underneath the notes, you only have to preserve the marking for the first row of buttons.
The characters positioned next to the basses must NOT be marked as chord symbols nor as song texts. In order to assign the first row of basses, either a letter or a fingering may be underlined or an underscore _, (_) resp. [_] may be written.
Generally, register information for accordion may be written as {AR:register}. With it, register is a string of characters consisting of the following letters:
| Character | Explanation |
| a | dot is positioned (a)bove |
| b | dot is positioned (b)elow |
| r | dot is positioned (r)ight |
| l | dot is positioned (l)eft |
| c | dot is positioned (c)entric |
The symbol g from the lower image is, for example, created by using {AR:omu}, in which the sequence of the letters does not matter.
Some register statements are positioned within the character set for accordion. For this, write a simple text and within it convert the character set to Accordion. The characters are explained within the image.
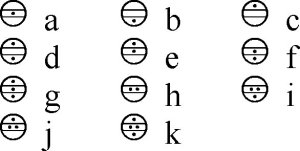
The characters for draw and push correlate with those for the bowing direction of bows with string instruments. With it, the character up-bow (V) represents drawing and the character down-bow (below open square) represents pushing. (In both actions, the characters correspond to the basic form of the bellows).
Alteration
Create an alteration by marking both notes in question and starting the capella macro "Tremolo bars" (on the menu bar represented by two 16th notes with a beam with half-note heads or using Shift+Alt+F10).
Annotations
If annotations refer to notation text, see Footnotes. Annotations may be added at any point by using {REMARK:number:text}. The reference for the annotation (in inkprint it is usually an asterisk or something similar) takes place at the position where the asterisk is actually situated, thus in the title or in a song text, after a syllable. Thus, right within a text, \...r is written down at the relevant position, ... being the number above. For reasons of clarity, both entries \...r and {REMARK:...} should be positioned quite closely together. The annotations under Word insertions also apply.
If the markup concerns the production of large print (rather than braille), note variants attached to the piece can be created as follows. Create an extra file with the notes and add an {REMARK:*:original:} or similar to the notes. This will then be used to create large print output. The two (Lilypond) files must then be merged.
Arpeggio
A lower-case k creates a simple Arpeggio (you can also do this via the symbol menu). Write an upper-case K in front of the notes in both staffs in order to create an Arpeggio over both systems. If the Arpeggios are doubled (so kk or KK), Arpeggio is written downwards.
If several voices are connected with an Arpeggio in a note line, it does not have to be written several times: the Arpeggio for all Voices is filled during convertion to Braille.
Articulation
Articulation may often be written as a symbol, via short formatting or as text. Unlike short formatting, the symbols can be bracketed. To ensure better readability under capella, the following texts are also permissible:
| Staccato | (.) |
[.] |
(. |
.) |
[. |
.] |
| Staccatissimo | (!) |
[!] |
(! |
!) |
[! |
!] |
| Mezzostaccato | (-.) |
[-.] |
(-. |
-.) |
[-. |
-.] |
| Tenuto | (-) |
[-] |
(- |
-) |
[- |
-] |
| Accent | (>) |
[>] |
(> |
>) |
[> |
>] |
| Reverse Accent | (<) |
[<] |
(< |
<) |
[< |
<] |
| Martellato | (^) |
[^] |
(^ |
^) |
[^ |
^] |
Artificial rests
If there are supposed to be rests in capella which are not there in inkprint, one can mark them and make them invisible by using: Shift+Ctrl+U. This does not have consequences on the placing of artificial rests in Braille, but it should almost always be the preferred notation. In rare situations, meaning if measures are obviously more suitable for part-measure and are still supposed to be written as a full-measure character with an inserted artificial rest, one can create these rests explicitly by colouring a normal rest grey. Rests marked in such a way do not have any influence on the global decision, whether a full-measure character or a part-measure character is used.
Bar Chord
see under Plucked instruments
Bar line
If a regular bar line is explicitly supposed to be written, one may (over)write the (possibly existing) bar line and colour it in a light blue.
In capella, dotted bar lines are marked by the fact that, if necessary, the regular bar line is overwritten and the new bar line is coloured green. Starting with version 6, the dotted bar line is firmly implemented.
Invisible bar lines may also be written in red.
Bar number
By using {M:number}, a bar may be allocated to a bar number which will be used from then on. This makes sense e.g. with pieces that have endings which are counted continually. Here, one may correct the count by using the bar number of the inkprint for the second and the following endings. If an upbeat is positioned in the middle of a piece, both the upbeat and the bar following have to be numbered by using {M:}.
In certain cases, it may be desirable to break a certain part or section internally in such a way that an indicated bar with the bar number information starts on a new line. The separation spots may be marked by using either {PS} (part separation) or {SS} (section separation).
Brackets
If brackets are positioned above or below a stave, they may be written using volta brackets, by suppressing the figures. Open ends and broken layouts may be determined.
If note-heads or rests are to be bracketed, simply write a pair of round or square brackets around them. Alignment should take place as closely as possible to the pitch. In case of more than one note and rest, one writes ( before the first note/ rest and ) behind the last note/ rest of the section.
In general, a green colouring (light green) of special characters leads to bracketing. Light green for round brackets, dark green for square ones. See also Articulation, Time signature, Key etc.
Breath mark
In capella, a breath mark may be written (created as symbol or text , or text V) with the anchor in front of the relevant note. The breath mark must be in all affected voices.The full breath (dots 6, 3-4) is created (as text) by using //. Breath marks can be bracketed accordingly (e.g. (//), (V) or [,]). The V has to be positioned slightly to the right of the note, so that it may not be confused by the program with an up-brow or down-bow, a Martellato or something similar.
Breve
When writing breve notes or breve rests, rhythm mistakes may take place in capella, whereas whole notes or rests work quite well. In this case, one may write notes/rests as whole ones and write {BREVIS} as text next to the note.
Changing fingerings
See under Fingerings
Changing intervals
Changing intervals are given with the note with which the intervals are supposed to appear by using {MOVE:intervals} or {MOVING:intervals}. Normal note values are acceptable as carriers, which are the characters A-H respectively. a, c-h (b is reserved for accidental, use B/H/h instead of b step). If there are chordal changing intervals, the horizontal movement has to be separated by using ;. In this case, one does not need separation characters for the vertical movement. If there are no chordal changing intervals, no separation character is necessary. Chordal changing intervals are read moving away from the keynote to the outside as a matter of principle (meaning according to the rules for Braille notes). They are not invariant against the direction of the intervals. The accidentals are the common ones: # (sharp), b (flat) and n (natural). Following changing intervals, there may be dottings . as well as fingerings with 1, 2, 3, 4 und 5 and, following this, possible slurs (-) and ties (=) may be given.
Examples:
{MOVE:a1-h-}creates fingering 1 on the A of the first changing interval and connects the changing intervals with ties.{MOVE:a4-#f2-;g3e1}creates a chordal changing interval.
Chord symbols
Chord symbols are written as normal text and are marked as objects that can be transposed under capella-scan. For writing chord symbols, besides the usual letters a-h, A-H, m, numbers etc, the characters from the following chart are used.
| characters | written as |
| ♮ | n |
| ♯ | # |
| ♭ | b |
| / | / or \ |
| ○ | O or o or 0 |
| ∅ | /O or /o or /0 or \O or \o or \0 |
| △ | A |
| crossed out small triangle | \A but not /A |
If part of the bar is supposed to be played without a chord symbol, {zahl} may be added to the chord symbol. With it, zahl indicates the length, e.g. 4 for quarter or 32 for 32nds. Dotting works like this as well, so e.g. {8.} for a dotted eighth note(quaver). Subsequently, within the chord symbols, rests are inserted automatically. If chord symbols change within one and the same note, this note can be written as A#7_A or as A#7{4}_A as well.
Attention: The information of length above the brackets { } may only be implemented on standardised chord symbol texts. Standardisation under capella: click with right-mouse button on the text and use the abc-icon within the pop-up menu.
If the character string is supposed to be recognised as a chord symbol, the text may be coloured dark green. Alternatively, {CHORD:...} works as well (e.g. {CHORD:Am} creates an A minor chord or the calling of Shift+Alt+F4.
Clefs
Green colored clefs appear in brackets.
Turquoise colored clefs are interpreted as "treble clef in the left hand system" and "bass clef in the right hand system". They must be in the hand in which they are to appear. A normal black clef then returns to standard notation.
Composer
In case of quite extensive or quite particular details of composers (e.g. if information on arrangements is put together with names of instruments etc.), it may be useful to bracket the names in {CREATOR:...}. In most cases this is not necessary.
Dedication
{DEDICATION:Dedication}. It is always placed before the heading {TITLE:Heading}. If the dedication is to be placed somewhere else, {TEXT-BLOCK:...} must be used.
Empty Syllable
If within a Braille file, a number of stanzas are associated with one stave and if syllables there have different kinds of slurs, an artificial syllable may be added on top of the character representing the empty syllable "'-" (Schwarzdruck) ('-) (Braille), in order to emphasise the slur.
As well as this, pauses can also be indicated in the lyrics. These pauses are to be written in capella in the lyrics as x, regardless of their length.
Ending
If an ending cannot be written in such a way as it is written in the inkprint, one may write it as {ENDING:name} (or alternatively {VOLTA:name}), e.g. {ENDING: 1., 2., 4.}. However, the original beam then has to be removed.
To adapt the encoding of pure Braille input see Incoding
Exercise numbers
Basically:
If letters A-Z are written as text on the bar line, or if letters A-Z are in frames (circle ellipse, square), then they are interpreted as an exercise number.
An exercise number can be defined explicitly with {REHEARSAL: ...}. Example: {REHEARSAL: B} or short {R: B}. This may prevent confusion with other signs such as the Barré-B. Furthermore, the spelling is suitable for producing correct large print.
Alternatively {>B} can be entered. The optimizer then replaces > accordingly with R:.
Figured Basses
In capella, Figured Basses always have to be written as songtexts. Here, special characters are n (natural) ), b and # for the different accidentals. In front of crossed out characters, one has to write \ or /. The numbers in a column are positioned in different songtexts, so songtext 1, songtext 2 etc. If two columns are positioned next to each other, they have to be written together, separated by using _. In front of _, length may also be given, if there is an uneven division: e.g. {4} for the length of a quarter (crotchet) note or {8} for the length of an eighths note (quaver). Further application lines may be created by writing ~ next to the relevant note.
ATTENTION: Since entering _ is a control command, you can write , instead of _ . The capella optimizer then replaces commas with _.
A problem in capella is the binding of figured basses to rests. In this case a text of the form {BC:...} (Basso Continuo, if necessary also over several lines) can be written. The same rules apply as above. If several commands {BC:...} are written on a note or rest, the meaning of whether the basses are to be executed simultaneously or consecutively cannot be clearly determined. They are interpreted as one after the other.
For example,
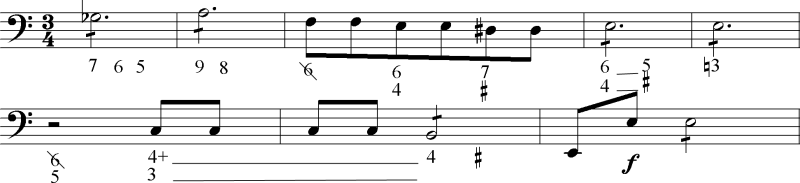
in capella with songtexts will be written as

Fingerings
In general, fingerings are automatically linked correctly with the notes. Occasionally, you may have to influence this linking. This is especially the case, if more notes than fingerings for more than two or ambiguous fingerings exist or if, in inkprint, a multiple fingering 1 is indicated by a small bracket. In such cases, the fingerings are described by a column and the blank is filled up by _. Alternatively, fingerings may also be written directly next to the note to which they belong.
If a varying fingering is positioned next to a note, this fingering can be generated in capella by putting a hyphen between both numbers, e.g. 5-4. If a finger is omitted then use again _, e.g. _-4.
If there is only one note, the alternative fingering is recognised automatically, if more than one fingering is positioned with the note. However, if it is a chord, a special kind of notation has to be used: fingering and alternative fingering are written separately by using |, so e.g. 1|2 or 1|(2). Thereby, every fingering may only consist of one line, which means that fingering blocks (e.g. 1|2//2|3) cannot be written. If, with alternative fingerings, there are blanks, one can write for example 1| or |4.
If there is more than one fingering with a note, which may for example be the case with ornaments, the fingerings are simply written in a row with or without blanks or separately, so e.g. 3 1 2, 312 or 3, 1 and 2 (separate). If fingerings with blanks are positioned in-between, they are coloured red by the optimizer. This is to be understood as a warning, as the meaning of this notation used to be a different one (the fingerings were spread out over the following notes).
See also lines of continuation on fingerings with Plucked Instruments.
Footnotes
Footnotes may be written before a note or a rest where they are supposed to appear later on in Braille. The notation for this is {FOOTNOTE:text} or simply {FN:text}. Footnotes are automatically numbered consecutively.
If a number of different places are to refer to one and the same footnote, one has to give a number for this footnote ({FN:number:text}) and later on refer to this number: ({FNR:number}).
Possibly, one may want to write a footnote in a different place, e.g. within chord characters. In this case, the reference has to be written as uncoded text (e.g. {chord:{`?*}C7}, {chord:{`?**}C7}, {chord:{`?*#c}C7}) and the footnote itself at any position within the notes with {FNT:number:text}, also referring to the above example {FNT:1:Chord letter remark 1}, {FNT:2:Chord letter remark 2}, {FNT:3:Chord letter remark 3}.
The problem of the number actually being output, in both cases does not depend on, when a number is given. So for example, only `?* and not `?*#a is written, even if it is given as number 1.
If the footnote contains an alternative musical text in Braille and this text should contain the characters { or }, the characters must be separated by a backslash as \{ or \} with a backslash.
For footnotes that do not refer to music, see Annotations.
General issues under Word insertions.
Free Playing / Cadenzas
In certain cases, notes may not have a timed value, which means that they have to be assigned the length 0. As these notes are treated automatically by capella like appoggiature, one has to add {NOGRACE} to these notes. The character for a possibly necessary synchronisation of the voices (dots 56-23 = cadenza characters) is created by {COINCIDENCE} or more simple {JOIN}.
Glissandi
An incoming glissando may be created in capella by drawing a line to the left of the note. If the glissando is supposed to be outgoing, the line has to be drawn to the right of the note. A line between two notes (anchor reach 1) is always rated as a simple glissando. A line which runs across a number of notes is rated as an outgoing glissando at the first note, and as an incoming glissando at the last note.
If the line is coloured red, the glissando is by the publisher.
Glissando through notation:
1-simple or outgoing glissando after the note with fingering 11=simple glissando after the note with fingering 11==outgoing glissando after the note with fingering 1-1simple or incoming glissando before the note with fingering 1=1simple glissando before the note with fingering 1==1incoming glissando before the note with fingering 1-single or outgoing or incoming glissando (depending on position on note)=simple glissando before or after the note (depending on position on note)==outgoing or incoming glissando before or after the note (depending on position on note)
The characters can be written before and after the fingering simultaneously.
Grouping signs
A grouping sign is created by using {GS}. It is written after the note in question. The CapScanOptimizer shows candidates for the grouping character by using dark-red.
Hand switch
The text {RH} creates a character for right hand in the notes, {LH} a character for left hand. The characters for a hand switch may only be positioned before a note, but not before a rest. {RHI} and {LHI} reverse the direction of reading.
If the characters at the beginning of a line are positioned with an individual stave, the stave is interpreted as a stave for the right hand or as a stave for the left hand.
Horizontal format
In capella, notes written in a horizontal format are are displayed in a portrait format. From the menu File / Page Setup / Orientation one may force a horizontal format within capella.
Idler
If, in inkprint, there is an idler, one can write an invisible rest and add the capella symbol for an idler to it.
Incoding
In case the file contains pure Braille (like in variations etc.) the encoding of those lines can be declared by {INCODING:code}. code is one of de|us|es|it|da|nl|no|utf-8. de is standard. The command should be placed at the beginning of the music so it will affact all following commands.
Indication of rights
Indication of rights may be written as {RIGHTS:Copyright}. Texts, which include the copyright sign © or the word chain all rights, are recognised automatically as indication of rights. Line breaks are transferred to large print. Line breaks are automatically removed for Braille output.
Indication of sources
Indication of sources may be written as {SOURCE:source}. Line breaks are transferred to large print. Line breaks are automatically removed for Braille output.
Information on playing time
The length of a piece can be set by using {PLAY-TIME: time}. For example: {PLAY-TIME: 1 min. 10 sec.}.
Information on register
Information on register may be written by using {REGISTER:ra} (ra being the information on register). Information marked in such a way is put separately above a piece. Information on register which is supposed to appear within the text, may not be marked by using {REGISTER:}, but remains as basic text.
Instrument classes
Possible instrument classes are the ones for Wind instruments, String instruments, Plucked instruments and Accordion. An instrument class may be attributed to the staffs, if the class does not follow indisputable from context. Indisputable indicators are: for wind instruments + (mute), for string instruments the characters for up-bow, down-bow, details on position and fret. Indisputable for plucking instruments are the fingerings p, i, m, a and the chord details.
If, for example, two guitars are positioned in two separate staves, in both staves {PLUCKING} has to be entered.
Instrument names
The name of an instrument within a certain stave may be determined by using {INSTRUMENT:name} or more simple {I:name}. This instrument name may also be output if applicable. If the abbreviation is supposed to be written, there are the following possibilities: {I:name:abbreviation} like e.g. {I:soprano:s.}.
If, within a staff two instruments in different voices are noted down, both instruments can be marked separately using a vertical line |: {I:sopran|alt:s.|a.}.
Intervals
By using {PRIME}, a unison can be written with a note-head. If two note-heads with different accidentals are to be positioned, one can write before them the two accidentals as characters separated by -. Alternatively, text {v1-v2} is also possible, v1 and v2 being the two accidentals. Permissible are also bb, b, n, # and ##. The positioning before the note determines, which note the character refers to.
In certain cases, one may also add a second voice in capella, which contains the artificial rests and the missing note. These are then merged into a chord with the unison.
Key
If the key is written in light green, it is noted in round brackets.
Keyboard instruments
Two systems joined by solid barlines and curly brackets are recognised as a piano. Exception: {ACCORDION}, {GUITAR} etc. If there is an additional line under this double system (bar lines not connected, curly brackets not connected), then this line automatically becomes an organ pedal.
Hints:- Square brackets in particular do not lead to recognition of piano.
- Three lines connected by curly brackets are recognised as piano and not as organ except the command
{ORGAN}is set. * Using commands{LH}and{RH}recognition as piano can be forced.
- The 3 systems should be connected by means of curly brackets.
- By means of the commands
{LH}and{RH}the recognition as right hand and left hand (=piano) should be forced. - The middle system can be assigned to the left or right hand by means of
{LH}or{RH}. - If there is neither
{LH}nor{RH}in the middle system, the clef decides how the assignment is made. - If the middle system is to be preserved, the command
{SEPARATED}can be used.
Language
The language of the piece can be set permanently via {LANGUAGE: code} or short {LANG: code}, where code is a language code like en, de, es, fr, it, nl, dk. This setting is then initially valid for the entire piece. If the language is unknown, any can be used as language code. It is then automatically conveyed "as correctly as possible".
The type of transfer also depends on the country you have selected. For example, fr in Germany leads to a spelling of the special letters using Braille dot 4 French spelling is used for the country setting France. The country can be set in the configuration.
If you want the set language to refer only to lyrics, you have to write {LYRICSLANGUAGE: code} or short {LLANG: code}. Other texts are then normally set according to the book or national language.
It is also possible to partially change the language, for example for individual verses. {LANGUAGE:...} or the setting from the configuration is then locally overwritten. See also under Song texts.
Lines of continuation
Generally, the beginning of the first line of continuation is created by adding two dots .. to the object in question, the beginning of the second one by adding --. The end of the lines of continuation is marked by {CL-Z} bzw. {CL2-Z} with the anchor of the note after which the line of continuation is supposed to end.
Longa (Note / Rest)
Longa notes and long rests are not supported by capella. In order to receive such a character, one has to replace the longa note by a breve and write {LONGA} with it. A breve rest follows subsequently. Characters of any kind (texts etc.) have to be positioned with the first character.
Maxima (Note / Rest)
Maxima and. maxima rests are not supported by capella. In order to receive such a character, one has to replace the maxima with a breve and write {Maxima} with it. Three breve rests follow subsequently. Characters of any kind (texts etc.) have to be positioned with the first character.
Media specific markup
Since sheet music can be produced in Braille, large print and audio, it may be necessary to distinguish between signs that are not intended to have the same effect in all three target media.
For HODDER commands, a prefix is conceivable, which is placed before the curly bracket. Thus a{TITLE:...} applies to audio, b{TITLE:...} to Braille, i{TITLE:...} to black dot music, l{TITLE:...} to large print, al{TITLE:...} to audio and large print output, {TITLE:...} to each output, and so on.
Similarly for dynamics specifications (write as text): b:p, b:(sfz) etc.
Metronome information
Normal metronome information consisting of note = number or note = note may be written as simple text via symbols.
The metronome data must be reproduced true to the original. Special characters in capella should be written as follows: ≙ as =^ or ^=, ≈ as ~~.
If these possibilities are not sufficient, one may write explicitly {METRONOME:text}, text being a real metronome information in Braille.
Next to the usual metronome information there may be other information which expresses a rhythmic principle, such as playing eighth as dotted. This kind of information may be given by using {RHYTHM:text}, text being pure Braille notes.
To adapt the encoding of pure Braille input see Incoding
New piece
This selection {piece} means that from the current position on, the notes are viewed as a new piece of music in their own right. This only works with MusicXML.
Organ pedals
Organ pedals can be adjusted with {ORGAN-PEDALS} or {OP} respectively. However, they are usually recognized automatically when the system above them is recognized as a keyboard instrument (that is, when both staves are connected by curly brackets).
Ottavæ
The beginning of an ottava alta is marked by using 8va or {OA-A}, the beginning of an ottava bassa is marked by using {OB-A}. Along these lines, the endings of ottav\ae\ are {OA-Z} resp. {OB-Z} or simply {O-Z}. The same effect is created by using the term loco. However, {OA-Z} has to be positioned with the last note of the section that is to be an octave higher, loco, on the other hand, has to be positioned with the first note to which the octave higher does not apply anymore. The section for an ottava may also be created via the concluding angle. For this, the beginning must be open and the line must be dotted.
Page turn
The text {P} before a note in the last bar creates the character for a page turn within the relevant staves. By using the text {P:number}, the page number of the inkprint can be given at the same time. For the last page of the book, {LP} or {LP:number} respectively should be written, as different rules of notation for Braille apply in this case.
If a page turn is supposed to appear within a bar because this bar reaches over onto the next page, one has to write, next to the character for the page turn, a fixed bar line at the end of the page as well as the marking {CONTINUES} or {VOCAL-CONTINUES} respectively.
A page turn after an indication of copyright or something similar, which is not part of the score itself, is created by using \p or \numberp respectively, @number @being the page number.
TODO: add example.
Pedal
Half-pedalling can be achieved via an underlined pedal character. If the pedal is supposed to be released immediately after the touching of the chord, the pedal asterisk has to be underlined.
Pedalset
The section may be written as o, O, 0, u or U. In addition, these characters may be bracketed. For the pointed print symbols for toes, the character for martellato is used, it may also be bracketed. As capella does not receive the positioning of the toe (above or below the staves) when it is written as articulation (recognisable under capella-scan by the fact that the characters are not connected to the note via a small anchor, but via a small note-head), either the symbol under capella-scan should be converted into an anchor object (by using the right mouse button) or the toes should later be added as symbols.
In the (rare) case of a change, fingerings should be written. Thus, 1-3 indicates a change from left to right toe.
Performance
Explanations of the sequence of sections, differentiated description of instruments to be used, etc. write by means of {PERFORMANCE:perform the individual verses first vocally and, when repeated, additionally instrumentally.} The standard indentation at dzb lesen is 2/4, abbreviation {PRFM:...}.
Phrasing slurs
Every light-blue coloured slur is described as a phrasing slur, even if it could be written as a simple slur. The blended colour magenta (red and light blue) results in a dotted phrasing slur. As red is a signal colour, red slurs are not recognised as dotted. See under Slur symbols.
Piano reductions
Within piano reductions, there may be information on the orchestra: This undergoes a special notation processing, which is why it has to be marked with {O:...} (orchestration). The script OrchestrationOptimizer helps with marking the information of the instruments.
For additional section divisions (e.g. in the piano part), see Bar number.
Plucked instruments
Plucked instruments are given with {PLUCKING} and also with {PLUCKING-INSTRUMENT}, if they are not undisputedly recognizable as such (see Instrument classes). If guitar, then replace {PLUCKING} by {GUITAR} to make sure that harmonics and open strings are translated correctly to Braille.
Roman numerals are interpreted as frets. One has to note that the numerals have to be written as capitals. Particularly, a lower case v is interpreted as a martellato. Strings are given with s1 to s7. In case of lines of continuation, there is s6.. (example for a beginning) and s6 (example for an end of a line of continuation) resp. {CL-Z} (end of first continuation line etc.).
When correcting such notes, the script GuitarOptimizer can be of help.
Information on barrés may be written in a number of ways. Possible characters are the ones from the following chart:
| large barré | C, B |
| small barré | /C, /B, 1/2C, 1/2B, PB, MC, MB |
If there are other combinations of characters, they can be listed in this file lib/definitions.pl/barre_indicating_words/2. The individual characters for barré are combinable with the information on frets, lines of continuation inclusive. Between, there may optionally be a dot, so e.g. C.VII or 1/2BIII...
The square bracket [ is used as marking for barrés which are positioned within square brackets in the inkprint. Examples are [I.., [IX or [V--. The end of a continuation has to be given by using ] (short for ]., first line of continuation) resp. ]- (second line of continuation).
If one slides towards a barré/fret/register, one may write a - in front of it, so e.g. -[II. If the barré covers more than one voice, a simple [ should be written with the following voices, no matter what was written with the first voice.
Lines of continuation on fingerings are marked with dots; thus, an extended fingering 3 can be written as 3.. (beginning) und ..3 (end).
Notations of changing fingerings are interpreted as an incoming glissando, for example -3.
If prima is supposed to be written as a laid-out touch (apoyando), it has to be underlined.
Publisher Ties
Such ties cannot be depicted in capella. In this case, a broken slur should be written. But if the beginning of the broken slur matches a note with a songtext syllable, then the meaning differs: Here a broken slur indicates different lengths of songtext syllables and is treated differently, automatically.
Publisher's symbols
Ties from the publisher cannot be displayed in capella. In this case simply draw a dotted slur.
If the source note contains a lyrics syllable, a syllable slur is created from the dashed slur instead of a tie.
If the publisher uses representations that differ from the standard, these can be stored in the file. For this purpose, please insert the following into the capella file somewhere.
Write the following texts, if:
- Dotted slurs should be in round brackets:
{PUBLISHER:(-)} - Dotted slurs should be in square brackets:
{PUBLISHER:[-]} - Dislocation characters should be in square brackets:
{PUBLISHER:[#]} - Slurs should be in square brackets:
{PUBLISHER:[<]} - Measures should be in square brackets:
{PUBLISHER:[C]} - Anything in square brackets instead of round brackets:
{PUBLISHER:[*]}(does not affect the brackets around offset characters!) - Triplets should not be written:
{PUBLISHER:-3} - Pedal character are written as ped. and * :
{PUBLISHER:Ped*}(default) - Pedal characters can be written as lines:
{PUBLISHER:Ped_}
See also Wedges
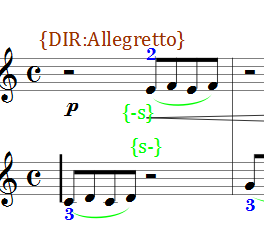
Reading direction of intervals
The control of the reading direction of intervals is always tied to the music prefix, as well. By using {DIRECTION:INVERTED}, a music prefix (dots 6 and 3) with inverted reading direction of intervals is created. If, instead, the character for the right hand is supposed to be there, one has to write {RH:DIRECTION:INVERTED}. In such a case, the term direction can also be omitted, as well as {RH:INVERTED}. Instead of direction, one may also write {dir} and instead of {inverted}, one may also write {inv}, e.g. {DIR:INV}.
References
The command {NR} ensures that no other area via simile, reference, parallel movement etc. may refer to this position. {NS} accomplishes that no simile, reference or parallel movement may be created here. In this way, {NR-A} and {NR-Z} resp. {NS-A} and {NS-Z} mark entire areas (in relation to real capella voices).
Section
By using {S}, a new section can be created. It does not matter which stave (staff) the character is in. By using {S:snumber}, the number of a section can be set. Furthermore, by using {S:snumber:mnumber}, the bar (measure) number can be set in addition to the section number. This makes sense if a piece does not start with the first section, or if it had to be split because of its size.
Attention: When using a number, you can only set the first section of a piece. The following sections are always numbered consecutively. It is not possible to force a change of section within the first bar.
If, for a vocal part with piano accompaniment, the bar numbers are to be included again during longer sections of the piano part, use {SS} (see under Bar number).
Similar to the {S} and {S:...} notations, there is also {SP} resp. {SP:...} and {SV} resp. {SV:...}. If a movement takes place in individual parts, {SV} is treated like {S} and {SP} is ignored. If a movement takes place as score notation, {SP} is treated like {S} and {SV} is ignored.
When automatic section setting is activated and when called up via the server, sections are created automatically if none are given. With shorter pieces, however, it may be desired that there are no sections. In this case, the first note of the piece can be marked with {S}. This means that the sections are set manually in the piece and then no further sections are created automatically.
Section title
Information on sections is differentiated from other markers by a number of features: they have to be positioned above the stave, they have to be in boldface and they have to display a certain minimum size (12pt). If directives are shorter than 5 letters, they have to be coded as follows.
If text is supposed to be written explicitly as a section title, this term can be enforced by using {DIRECTIVE:text}.
Separation of large pieces
Possibly, large pieces may have to be separated into two or more components. Suitable positions for this are section breaks. These should be designed in such a way that no slurs, ties or something similar reaches over from one section into the next one. Furthermore no note must rfeach from old to new section. The last section before the separation position should be marked with {CONTINUES}, in case the separation of the piece takes place within one bar. This has an effect on the output of the section information and on the putting of continuation dots for bars. A decision about what makes a large piece depends on a number of factors: next to the complete number of voices per system, this is also the complexity of the notes. So, pieces with more than 80-150 bars are large pieces.
If references to sections have to be given, which do not have a destination, one may write into the corresponding text {SR: number from-to} (section reference). For example: {SR: 1 0-8} or {SR: 15 87.-96}.
- Split up the capx file music.capx into partes named like music-1.capx, music-2.capx and convert them by standard call or
- Insert system breaks at section boundaries marking them by keyword {PIECE}. Offline call will be
python %hodder_home%\bin\c_split.py music.capxor simplerchodder music.capx
Shortcuts
Instead of {TITLE:...} you can also write t:... (with lower case letters and without curly brackets), the capella optimizer will replace these abbreviations accordingly.
More abbreviations: c: (CREATOR), d: (DIRECTION), s: (SOURCE), l: (LCAPTION), st: (SUB-TITLE)
Size of note-heads and rests
capella does not support chords in which individual notes are in fine print or large-print notes and rests. By using {SIZE:info}, information on size may be attributed. Concerning chords, notes are always looked at from top to bottom. Permissible qualities are (h)uge, (g)reat, (b)ig and (l)arge for large-print notes, (n)ormal and (m)edium for normal notes (standard) as well as (s)mall, (t)iny and (c)ue for small-print notes. When this information is given, the characters may be separated by using , ; or |. The characters for separation may also be omitted.
Example: {SIZE:nkn} creates a chord where the second note-head is in fine-print. If {SIZE:g} is positioned next to a note/ rest, it is marked as large-print.
In order to assign the same kind of design to a number of notes/ rests, the command {SIZE-A:info} is used. It is completed by using {SIZE-Z}. In order to assign a design to notes only (and not rests): {NSIZE-A:info} and {NSIZE-Z}.
Slide
A slide with a slur going upward is created by using {SCHLEIFER-S} (superior), a slur with a slide going downwards by using {SCHLEIFER-I} (inferior).
Slurs that do not end on a note
Slurs without an ending can be created by putting the starting and the ending anchor of the slur on a note. If a tie instead of a slur has been written, this will not be interpreted as a slur without an ending.
If a slur is positioned at the end of a stave, a Slur symbol should be written without fail, so that the slur will not be linked into the next stave.
Slur symbols
In addition to normal slurs, slur runs can be described explicitly in capella. To achieve this, you can write one or more slur symbols in the form of {symbol} in front of a note/chord. In this case, symbol is one character from the table below (listed with curly brackets). For example, {--} represents a long slur (cc), {-} a short one.
If it is a matter of a chord, the corresponding note can be selected by using _. Commas, semi-colons or the vertical line with any number of blanks may be used as delimeter. With it, notes are always looked at from top to bottom. For example, {_, --}, {_;--}, {_ | --} resp. simply {_ --} write a long slur next to the second note of the chord (counted from the top).
Nevertheless, only one slur symbol each may be written in-between curly brackets! For example, {-- --} is not permissible; in this case, one would have to write {-- _} and {_ --} in front of the chord. Attention: This restriction only applies to slurs and voice-leading lines, but not to ties!
Using bracketing, a slur within brackets may be created. Thus, for example, {(<-)} and {(->)} create a phrasing slur within brackets.
Slur symbols
| Symbol | Meaning |
-- resp. +-- |
doubled slur |
- resp. +- |
slur |
.. resp. +.. |
doubled slur by the publisher |
. resp. +. |
slur by the publisher |
~ resp. .~ |
slur with an unsettled ending |
By putting a + in front of the characters -, . etc. these become slurs of the kind incoming and out-bound slur on a note.
| Symbol | Meaning |
v- resp. v+- |
slur leading to another voice |
v. resp. v+. |
slur by a publisher leading to another voice |
s- resp. s+- |
slur leading to another stave |
s. resp. s+. |
slur by the publisher leading to another stave |
Through the additional +, these slurs are in turn marked as incoming and out-bounding slur on a note.
| Symbol | Meaning |
--v resp. --s |
in voice/stave incoming double slur |
..v resp. ..s |
as above, but by the publisher |
-v resp. -s |
in voice/stave incoming slur |
.v resp. .s |
as above, but by the publisher |
Normally, slurs are added automatically so they fit syllables and their notes. This also happens to short slurs for syllables in different languages (ca-slur, cb-slur etc.).
But if there are more than two notes covered by a language specific slur then slur symbols have to be used:
| Symbol | Meaning |
--1 |
doubled slur in the first language |
-13 |
simple slur in the first and third language |
Symbols for phrasing slurs
If possible, the blue coloration of the slur is to be preferred.
| Symbol | Meaning |
<- |
starting point of a phrasing slur |
-> |
end point of a phrasing slur |
Symbols for ties
Ties can be written in a similar fashion. With this, the character - is replaced by = and . by :. Thus, {=} is a simple tie, while {:} is a tie by the publisher. A doubled tie {==} represents a chord tie, {::} a chord tie by the publisher.
| Symbol | Meaning |
=- or -= |
Arpeggio tie |
:. or .: |
Arpeggio tie by the publisher |
In unambiguous situations an editor's tie can simply be written as a normal dotted slur. See also Publisher's symbols.
Following are the slurs which lead from one voice to another respectively from one stave to another. In addition, the variations by the publisher are given.
v=, v:, v==, v:: |
(chord) slur from one voice to another one |
=v, :v, ==v, ::v |
(chord) slur from another voice |
s=, s:, s==, s:: |
(chord) slur from one stave to another one |
=s, :s, ==s, ::s |
(chord) slur from another stave |
Symbols for voice-leading lines
Voice-leading lines may be created in a similar fashion which means that they have to be positioned within curly brackets:
| Symbol | Meaning |
-/ oder -\ |
outgoing voice-leading line |
./ bzw. .\ |
outgoing voice-leading line by the publisher |
/- bzw. \- |
incoming voice-leading line |
/. bzw. \. |
incoming voice-leading line by the publisher |
See also Straight line for voice-leading.
Example of a simplified input of slurs between systems:
Small-print notes and rests
see under Size of note-heads and rests
Solo part, to be accompanied
If one part is a solo part that is to be accompanied, one has to mark it by using {SOLOPART}. Note: In Braille notes, as standard, the section information is written before the prefix of the solo part that is to be accompanied and not above the staves.
Son filé
Son filé is recognised from the text <>.
Song texts
If in song texts, there is supposed to be written a _ (character for dots 4, 5, 6) at the beginning of a word explicitly, one has to mark it either as \_ or as {_}.
If at the end of a syllable, there is supposed to be a -, one has to mark the character as either {-} or \-. If one writes {-}, the subsequent word is separated by a space. On the other hand, if one writes \-, it is a case of a compound.
In case of more than one syllable such as Amen being positioned with one note, one has to write A\-men within the song text, so that later on it comes up as (Amen) together with the number of syllables with the note. If a number of words are positioned with a note, a special marking is not necessary. At the same time, \- functions as an indication of separation for the typesetting.
In general, \- can be used to give hyphenation hints for the text sentence.
Attention: Within the input window for song texts in capella, the characters \ and - have to be escaped, which means that \_ is written here as \\_ and \- as \\\-.
If one writes a simple hyphen - between two syllables, these syllables are separated and the second syllable is written with the next note. This makes sense for outputs, where words as a whole are positioned underneath notes - it is not necessary, to separate the notes by hand and to position them anew.
| Position: | in the syllable centre | at the end of the syllable |
- |
separating syllables and writing them with the next note | tying of syllables |
\- |
information on possible hyphenation | Compound with - |
{-} |
real hyphen within a syllable | Omission of a word ending |
If the lyrics of a note line are to have a different language, the entry {LANG:code} must follow in the range of the verse number. Note: in capella, stanza numbers are separated from the lyrics by #.
The term "eleison" receives a special treatment. In this case, no information on separation is necessary. The correct notation is determined automatically from the context.
If texts that can be considered as song texts are positioned separately from notes, there are two possibilities of notation: {LYRICS:...} marks this text as a real song text, which means that it will appear together with <; below the notes.
With {LYRICS:lang:code:...} you can set the language for this strophic block differently to the rest of the piece.
If such texts are marked with {LTEXT:...}, no character <; is written in front of them. With {LTEXT:lang:code:...} you can set the language for this strophic block to be different from the rest of the piece.
If verses are available in different languages, several {LYRICS:lang:code:...} or {LTEXT:lang:code:...} blocks can be written.
If text blocks are written simply and without any marking, the following characteristics for an identification have to be available:
- at least double-spaced
- leading stanza number together with dot and subsequent space
- fixture within the lowest stave
Stave changes
If slurs or hairpins are supposed to be continued across stave changes, a number of conditions have to be met. In case of hairpins, the hairpin has to start distinctively to the left of the first note within the new stave. The same holds for slurs, but in this case the end of a tie of the last stave has to be positioned distinctively to the right of the last note.
Since version capella 8.0 the property "Is continued" can be set in the edit window of the continued slur or hairpin.
Staves
By using colours, one may control the behaviour of notes within and in-between staves. If notes are coloured in a dark green, they will be written down in a separate section, if the option is set accordingly (detach extra staves in a separate part). This is useful, for example, if the organ pedal is supposed to be written in a separate stave, apart from the left hand. The colouring does not have an effect, if song texts are present.
If the right hand, because of the graphic design, is notated within the stave of the left hand or the other way around, the notes may be coloured in cyan blue (dark turquoise). Then, they move into the other stave. In order to unite the notes with changing hand signs in one stave, one may also colour those notes turquoise which are supposed to move into the other stave.
If the fingerings of such notes, which are supposed to move between staves and are coloured in a cyan blue or turquoise because of it, are already notated within the other stave, these fingerings should be connected directly to the coloured notes in order to prevent an incorrect allocation.
If notes are connected by a beam between staves, then the position of the notes by using capella is neither predictable nor controllable, which means that one cannot influence, if they are going to appear in the left or in the right hand. Such beams may be separated in capella-scan. If one does not do this, the notes are standardised in a stave by the script CapScanOptimizer and are automatically tagged with a character for change of hands. At the moment, the correct allocation to a stave has to take place by hand because of the given reasons.
If the right hand is notated in the system of the left hand or vice versa due to the graphical representation, the notes concerned can be colored as follows:
| No. | Color | Code | Meaning Braille output | Meaning large print |
|---|---|---|---|---|
| 1st | Turquoise | #008080 |
Note notes in the system of the other hand | none |
| 2nd | Light turquoise | #00ffff |
notes in the system of the other hand note down with Hand switch |
none |
| 3rd | Cyan blue | #40ccff |
no notes in the system of the other hand, if necessary with bars between the systems |
note in other system |
The 3rd notation is automatically prepared by the optimizer. The 2nd should only be used in those cases where the black print should look like the capella source.
By means of{HIDE} a system can be made invisible/hidden. The possibilities, which the configuration offers, are to be preferred thereby:
- select parts via the MakeBraille interface
- filtering parts/note lines via the local Hodder configuration (if installed locally).
Stem signs
In general, stem signs are created independently.
Stem signs can be written separately. They are always given from top to bottom via a list in the form of {STEM:stem}. Here, stem is an expression consisting of (possibly separated by a comma or otherwise) _ (for no stem) and real stem information. Stem information consists of a number (4 for quarter, 32 for 32nd etc.), optional following points and optional slur information (- for a slur or = for a tie).
Examples:
1. {STEM:_, 1} creates a stem sign with the length of a whole note on the second note from the top.
2. {STEM:2.=4} creates a stem sign with the length of a dotted half note and a slur on the first note from the top and a stem sign with the length of a quarter note on the second note from the top.
Straight line for voice-leading
Starting and end point of straight lines for voice-leading are marked by using {VL-A} und {VL-Z}. If the straight line for voice-leading is positioned next to a chord, it is absolutely necessary to use the notation put down under Slur symbols.
String instruments
String instruments may be given via {STRING} or via {STRING-INSTRUMENT}. Following from this are Roman numbers recognised as information on strings. Information on register (position) are given by using p1 to p12. For the instruments violin, viola, violoncello and contrabass, instead of writing {STRING}, it is better to write {VIOLIN}, {VIOLA}, {CELLO} resp. {DOUBLE-BASS} or simply {BASS}, so that, depending on the instrument in question, flageolet and open string may be differentiated. This has effects on possible shorthand notations. See also Instrument classes.
Text blocks
Text blocks are sections with indistinct functions which may be at any position within the notes. These may, for example, be comments or introductory texts on a composer or an epoch. They are created by using {TEXT-BLOCK:first:other:append:Text}. Instead of TEXT-BLOCK, one may also write TBLOCK. first provides information about how many free forms are to be at the beginning of the first line; other gives the number of free forms for the following lines. append states after which element of the document the text is supposed to be. The following terms are permitted for append:
| append | explanation |
| top | text block on the top |
| super-title | text block below the top headline |
| title | text block below the headline |
| sub-title | text block below the lower headline |
| caption | text block behind a second-degree lower headline |
| creator | text block below the composer |
| notes | text block below notes, song texts, chord symbols etc. |
| rights | text block below the information on rights |
| source | text block below the information on sources |
| play-time | text block below information on play-time |
| bottom | text block at the bottom of the notes |
With notes, a simple line break will be ignored. If one wants to start a new line, an additional \n or <br> has to be written at the end of line. If empty lines are supposed to be added above or below the text, one has to add the respective number of \n at the beginning resp. at the end of the text. For example: {TBLOCK:2:0:title:Any Text\n}.
If text blocks cannot be written because a reference object append does not exist, they are added at the end of the document.
Alternatively, TEXT-BLOCK can be used with a roll. This automatically adapts the formatting to the respective country behaviour: {TEXT-BLOCK:role:Text}.
instrument-list
Texts
In certain circumstances, by using {TEXT:text}, one may like to force that certain words are preserved as text. This may be true e.g. for numbers, which are then written as text and are not, for example, supposed to be interpreted as fingerings. In general, texts do not have to be marked. If parts of a text are supposed to be transferred faithfully, one may put this part in brackets. Thus, dal 0 al 0l-0l becomes dal #j al #jl-#jl, while dal {0} al {0l-0l} or simply {dal 0 al 0l-0l}@ transfers the character string faithfully into Braille.
Time signature
In capella, if two time signatures should alternate, the smaller and then the larger time signature should be notated because otherwise the bar lines get mixed up. The sequence is determined automatically.
If the information alla breve is followed by 4/2, it will be written as alla breve.
If a C-time as time signature is followed by 4/2, it will be written as C-time.
If time signatures are coloured light blue, only the numerator will be written.
If time signatures are coloured light green, the information will be written in brackets.
If time signatures are coloured light red, they remain invisible in Braille. This can be useful for two things: One being paraphrased, overlong bars such as with Liszt. The other being a change of character, for example from 3/4 to 6/8, without this being explicitly there in the inkprint. Thus, the manner of the simile and others more may be adjusted. A real time signature can be written before such a colored time signature. Example 4/4 50/4 where 4/4 is then output.
If a time signature is coloured pink, in Braille, it receives a marking as being inserted.
If a piece is set in senza misura and bar lines are filled in, in capella-scan, one probably has to add a time signature at the beginning of each page which is bigger than the biggest correct one; and one has to delete it again at the end of this process in capella or fill in senza misura as time signature (time signature invisible). In capella, only then it can be guaranteed that the respective bar lines appear (within the colour mode via F11, the bar lines remain black and are not as green as usual). Important: The entry of a time signature does not seem necessary to get correct results.
If offbeats are included in a piece, these have to be marked (e.g. {M:0}).
If a specified notation is to be used (e.g. if note-heads are supposed to be positioned in the denominatior), a normal change of time signature has to be written and the following note has to be received as text {TIME:time-text} with the relevant Braille {TIME: #c'.n.}.
To adapt the encoding of pure Braille input see Incoding
Title
If a song title is supposed to be forced, e.g. because it includes the composer's name, one may write {TITLE:...}.
If one writes {SUB-TITLE:...} resp. {STITLE:...} instead, a lower heading is created which is normally underlined by using ,; {SUPER-TITLE:...} creates a heading which is underlined by using =.
{CAPTION:...} and {LCPATION:...} create headings which are not underlined. While CAPTION is centred, LCAPTION is left-aligned.
Lower headings and captions are equal to the names of composers, which means that the order of the output depends on the anchor.
Tone clusters
Tone clusters are recognised as tone clusters, if, in inkprint notes, at least two notes are positioned together in a chord and if all notes of this chord have square heads. Only the two outer note heads are counted for the tone cluster.
Trill wave
From the menu characters/music notation/wavy line choose the trill wave and put down the respective anchor. Alternatively for example with multiline layout, put two dots (tr..) with the trill symbol. In this case, write {CL-Z:tr} (continuation line stop) for the end of the line with anchor next to the respective note.
Triple dotting
For a triple-dotted note or rest, put a rest with the missing length after the double-dotted one. Additionally, {3-DOT} resp. {DOT-3} has to be written with the double-dotted note.
Triplets
Rhythmic alignments, which are not able to be depicted in capella-scan or capella, may be written by using {X:n}, n being the value. If, for example, there is a 20th triplet, one has to write {X:20} with every note. Alternatively, one may also write {XX:20} with the first note and {X:20} with the last note.
Updates
Updates should take place regularly. For this, the user has to be logged in as administrator. The corresponding files can be found on the server http://www.capella.de. There, the sections menu and submenu download/ download-page can be found on the left. On the right, the products capella and capella-scan (Download capella resp. download capella-scan) can be found. If one follows these links, one gets, via further links, to the setups.
Variations
If a variation refers to vocals, one may write the variation as a second voice and by using small-print note-heads. Only the changed notes have to be there - the others may be copied from the first voice or may be simply left out (artificial rests).
Variations of complete bars outside vocals may written by using {VARIANT:braille} resp. {VARIANTE:braille}. In this case, braille refers to the normal Braille notes. The characters { and } are transferred into Braille just as they are, no \ is written in front of them as they are not texts in the normal sense of the word. If word inserts are there, umlauts, ß and uncontracted Braille characters have to be written in Braille right away, as the text braille is transferred one-on-one. Additionally, the following special characters may be used:
| start of a new bar (if more than one bar) (measure) | \m |
| simple bar change possible | \! |
| bar change after voice character possible (voice) | \v |
| change within a word of a word insert possible | \- |
| change after a word in word inserts possible (space) | \s |
| change after word inserts possible | \. |
| bar change with figured basses, if articulation etc. follows | \# |
The variation bar resp. the variation bars are always at the end of the bar which contains the information. If, for example, there is a variation taking place for three bars, the information has to be included in the third bar.
Variations with song texts which are marked in the inkprint with small notes, are created automatically.
Examples (fopr German encoding de):
{VARIANT:?#a!h.{?}{VARIANT:?#a!h.$y\!!e.~\!e.{2`\v!f.m\!e.m\!j.m?}{VARIANT:?#c_n.2`\v;_fh!d=\!;_gh!e \m_n.*$c \m4.*x\!>8?}bzw.{VARIANT:?#c_n.2`\v;_fh!d=\!;_gh!e\m_n.*$c\m4.*x\!>8?}{VARIANT:?#a...`sem\-pre`le\-ga\-to\.3!g...?}{VARIANT:?#a...\s`dc.\sal\sfi\-ne`\s...?}
To adapt the encoding of pure Braille input see Incoding
Vocal range
Vocal range may be given by using {ambitus:text} or {range:text}, text being pure Braille notes, which are taken over into the output just as they are.
To adapt the encoding of pure Braille input see Incoding
Voices
In capella, if there are voice crossings or other unusual things, notes may be assigned to specific voices. On the one hand, this assignment explicitly prevents an automatic sorting of the voices and, on the other hand, a possible chordal summing up. The possibility of voice assigning should be used as little as possible. In particular, it is sufficient to only mark the part of a bar in question. Voice assigning takes place through colour mapping. With it, the following colors are to be used:
| Voice | Colour |
| voice 1 | purple |
| voice 2 | dark yellow |
| voice 3 | dark blue |
If notes are not to be combined chordally for the entire system, the {SEPARATED} command can be used.
Wedges
By colouring wedges, additional attributes may be commanded. Here, red wedges are by the publisher (dashed), light green ones are put in brackets and yellow ones are dashed as well as put into brackets.
By using {W<A} and {W<Z} resp. {W>A} and {W>Z}, explicit beginnings and ends of wedges may be set. Here, brackets work as well, e.g. {W(>A}, {W>)Z, {W[<]A}, {W<]Z} etc.
Whole Rests
In the case of smaller metres, like e.g. 3/8 time, it may be impossible to write a whole rest adequate to inkprint. In this case, one may put an adequate different rest there (e.g. a dotted quarter note) and add {WHOLE} to this marking.
Wind instruments
Wind instruments may be explicitly described as such using {WIND} or also {WIND-INSTRUMENT}. This has a direct effect on the recognition of o, O resp. 0 as a mute symbol. Since, in Braille, the character is identical to the one for flageolet, the explicit details of the Instrument classes have no affect on Braille, but they do have an affect on other output formats such as MusicXML.
Word insertions
In capella, words are always tied to a note. By using the context or from additional information, the meaning might be changed. Important allocations are Composer, Section title, Metronome information, Vocal range, Information on register, Information on playing time, Indication of rights, Indication of sources, Footnotes, Annotations, Fingerings, Piano reductions, Exercise numbers, Song texts and Variations.
The word insertion {FINE:...} forces that word insertions are tied to the end of a bar. This also applies automatically to words which include da capo, fine or something similar.
The word insertion {ATTACCA:...} forces that word insertions without word characters are written behind possible bar lines. This always applies automatically to words such as attacca.
If text insertions are supposed to be kept explicitly, see Texts.